
Get Your Garden Started
- Details
- Category: Grow Your Own
- Created on Thursday, 29 October 2020 14:46
- Hits: 777
Herbs and I get along. They don’t talk back. They pretty much do what I tell them. And I can safely let them roam about the ranch without fear of them running off. So here are a few tips to get you started if you plan to raise more than just a few head.
The most important thing to remember is that all herbs are different, and so are all environments. Because of that, few of my tips are laws of herb physics. Yet I find that if I ignore my plants, they’ll do poorly, so I tend to coddle them and change the protocol to match the mood, weather, temp, season and all the variables in miniature agriculture. You’ll find that each of them responds to good food and water, just like all the livestock on the ranch.
Beginner Stuff
Folks often ask me what to buy in order to get started. Good question, yet until you get into it you won’t really know what you need until you figure out what you like. The obvious items are soil, containers, a watering can, a trowel or two, various pots and your herb seed, cutting or seedling stock.
The herb stock you use depends on your time and commitment level:
- You can plant seeds from scratch
- You can take a cutting off an existing herb
- You can just buy the seedling herbs all ready for you to transplant
I use all methods depending on my mood, the season and what’s available. Usually, I start with seeds in 3” to 4” well-drained containers like below. I prefer the plastic pots over the biodegradable peat moss pots. Easier to handle. Reusable. Affordable. And I never trust those damn peat moss pots to disintegrate in a timely manner. I mean, the whole point of repotting is to give the roots a chance to stretch out, not have to fight out of a peat prison.
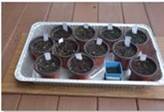
Sometimes, I’ll start the newly seeded pots by letting them sit in a larger container. In the case above we used one of those aluminum disposable turkey roasters. This gives the little pots a chance to soak up some water from the bottom while seeding, yet only during the seeding process because you don’t want standing water under most pots as a general rule. So don’t leave any of your pots in standing water for too long. It’s a good way to get your pot soil good and wet at the same time it controls your runoff, yet you don’t want those new roots to get damaged from too much water.
The next tray, below, shows some sprouts and seedlings. You might have to look close to see the little new ones. Take note of both the 3.5” seedling pots and the plastic trays I put them in. Just my preference for making it easier on me. Keeping things organized.
Note that you can also keep different herbs in the same pen, as long as they get along.
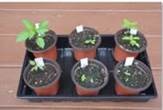
Replanting is where it gets tricky. Not only because it’s a shock to the plant but you have to decide on what pot comes next. Some of the plants in the tray below are about ready to be transplanted to their next home. It’s not always based on a standard height. You’ll quickly learn which herbs like to be transplanted and which don’t, and at which stage in their lives.
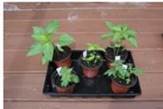
I replant to 8” pots for the following, and that’s normally where they live out their lives:
- Basil
- Oregano
- Parsley
- Cilantro
- Chives
- Some peppers
You can keep rosemary in an 8” pot if you trim it a lot, yet it prefers a larger pot in the 12” to 15” wide category for a lifelong relationship. After all, it’s more of a bush. A friend of ours, Andrea, gave us a rosemary plant a few years ago and we repotted it into about a 10” or 12” pot then and it’s still our best and oldest herb plant.
If using seeds, follow their instructions for planting them. You’ll find that most suggest planting seeds ¼” deep.
Dill really likes a pot to be at least a foot deep. It’s a long root plant. And I tend to plant dill seeds in its lifelong-pot to begin with, because dill just hates to be transplanted.
You have to try some potted onions. There are two good ways and I use both. The fast way is to buy green onions at the grocery store, then cut off a good two inches at the rooted end… that’s right, the white onion part. Just the use greens for now, then stick that 2” cutting of onion in a shot glass of water, roots down. The hack of cutting off and using the rooted ends of green onions really does work, so it’s self-propagating as a bonus. We find it only takes a few weeks from the cutting to the shot glass to the until you have onion greens to eat.
Peppers
I know it’s not an herb, yet pepper do great in potted herb gardens. Peppers continue to produce so you want to make sure they end up in a large enough pot to accommodate some growth and some longevity. For larger pepper plants like the Anaheim Hot Pepper or a healthy Jalapeño Pepper I might use a pot as large as 14” diameter.
You really can’t go too wrong in pot selection for most pepper plants because they seem to transplant well. I normally plant several pepper plants of each variety with each seeding season. That gives me the option to transplant the initial seedlings into a medium container until we decide each plant’s destiny. For instance, for Jalapeño Pepper or Cayenne Pepper plants I’ll initially transplant my seedlings into 6” wide pots for those which might end up as gifts or as backup plants. Yet for Jalapeno or Cayenne plants that I definitely intend to harvest for ourselves, I default to an 8” wide pot. The 8” pot might not be large enough for a long term plan yet my herb ranch is organized around having ready crops, year-round. That means having many pots of each herb, based on season, so that we have a few generations available… seedlings, immature plants and mature plants. This ensures we’ll always have fresh herbs at the ready, even when a disease or weather shortens the life of your herbs.
Tomatoes
Okay, you got me again. Tomatoes are not an herb and tomatoes generally don’t like pots, so I try to keep it down to one plant per 8” pot for cherry tomatoes, small plants. A bit larger is better.
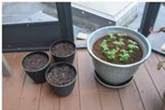
Below is the tomato plant nursery in a large pot, with three additional prepared 8” pots for transplanting this weekend.
Transplanting
No real secrets here. It’s dirt. Put it in the pot. Yet I do find that you want to check the bottom for good drainage and if it comes up short then place some rocks on the bottom to break things up.
I like to get the dirt about 1” from the top for 8” pots because it makes it easy to water and maintain. In larger pots we tend to have the dirt 2” to 3” from the top. That gives you some working room. Also, we don’t mess with bark or mulch or any moisture saving ground cover. The pros I follow don’t use it much either. Good examples of both depths are in the photo.
When you fill a pot for transplanting I recommend you fill it based on how much dirt is being transplanted from the old pot. Basically, focus on the depth rather than trying to dig a perfect hole. My secret is digging a pit while getting a nice flat bed that will match the new transplant’s bottom so that his neck is sticking out of the ground just right when I sit him down. If that goes well, then proceed to fill in the sides by brushing in the dirt you had pushed aside, then add more as needed. Make sure the roots are gently buried yet don’t bury too much stem.
Plan of some settling of the soil with the next few waterings. I tend to replace that dirt with a small scoop occasionally. Otherwise, you might find your roots exposed.
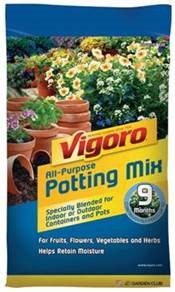
The best all-round soil I’ve found is at Home Depot, shown below, for $7.00.
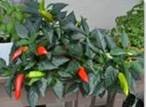
Below is our Hot Burrito Pepper plant. It’s not really hot, but it’s fun and I really like the way it spruces up the ranch.
We buy most of our herb stuff from Home Depot or a local nursery. Quality is important in all things so make sure you’re getting your value. I always compare local products to at least Amazon because the volume deal is sometimes cheaper by a long shot, yet you know that, don’t you?
**************************************
Rancher Ron has been helping ITG research sustainable, at-home gardening throughout 2020 to not only harvest vegetables for the kitchen, but also as a hobby that we can all enjoy as we spend more time at home.
Focus on Health
Best Defense is Health
It is clearly undisputed that the best preventative medicine is good health. People challenged us to add more to our weight loss program. The more they were asking about was simply more health. Not only what to eat more of, but what to consume less of. More about what we can drink, plant, buy, eat, or study to be healthier. We all want more out of life and we've found excellent tips, tricks, advice and even recipes to improve our lives. Everything we've found that makes sense to us has been small in nature. After all, by definition, if you're looking here for ideas then you're well ahead of the game. Small victories!


